OpenGL Display Window
Exercise

Intro
I haven't had a lot of use for OpenGL lately and found myself getting pretty rusty at it, so I decided to write a little 3D display window in C++ using OpenGL to sharpen up those skills. The goal wasn't to create anything fancy, just a simple cube with directional lighting as a refresher on the basics.
Before this exercise I had some experience with both legacy and modern OpenGL, but it never felt like the information really stuck in my mind. A few years ago I took a free course on edX called Foundations of Computer Graphics (which I believe is still offered). At the time I had none of the prerequisite C++ experience, so I mostly picked up some general graphics programming theory while most of the actual implementation details went over my head. Since then I took another course at university which went into more depth, but once again it didn't really sink in enough to retain it longterm. So it seemed like about time to tackle a personal project as a refresher and fill in those mental gaps that never got filled in class.
Resources
For the most part I followed this excellent tutorial series by Yan Chernikov (better known as The Cherno) to initialize my window and display the first triangle. If you're starting out in games or graphics programming you should definitely consider checking out his stuff; he's got loads of really well-thought-out videos and resources, and even a pretty active open Discord community for learners.
Setting up the cube, transform matrix, and lighting I mostly did from memory. Joey de Vries has a great website (here) with really easy to understand, step-by-step write-ups that I referred to for some supplementary info. And opengl-tutorial.org has a section on basic shading that I referred to while adding the directional light (the rest of the tutorial series looks great too, but I haven't had a chance to check it out yet). Also if you don't know about docs.gl yet for organized, detailed OpenGL documentation, now you do. It's an awesome resource for info on usage of specific functions.
Just a little more housekeeping left before we get into it. I used GLFW to set up the window and OpenGL context, and GLEW to load in the OpenGL extensions needed. These are super simple to use, well documented libraries that can get you up and running quickly with a window and context to work in.
Process
I'm planning a future post going into more detail on writing a renderer from scratch in DX12, so I won't go into the specific code for this exercise too much. The resources above should cover just about everything you need to know if you want to do this exercise for yourself. So let's get into it!
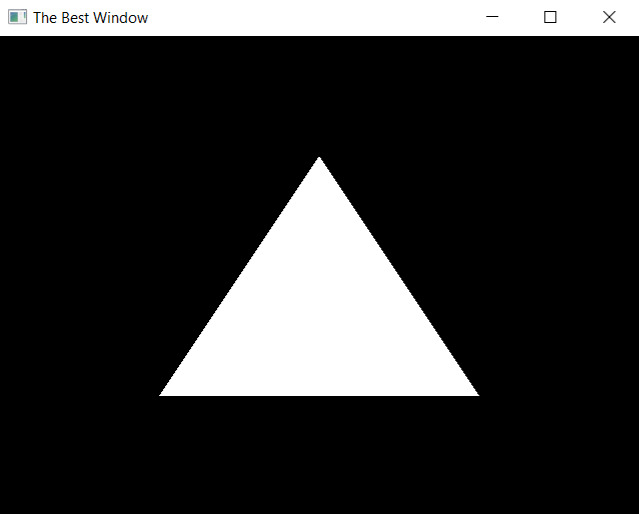
The first step is initializing a window and OpenGL context using GLFW. I got a window displaying a simple triangle up and running quickly using legacy OpenGL and a default shader, shown to the right. From there I converted it to modern OpenGL, adding vertex and index buffers and an extremely basic shader that simply gives the whole triangle a uniform flat color.
The code below shows initialization of the vertex position buffer, but the process is similar for the index buffer (and later the normal buffer) except it contains unsigned integers instead of floats.
// Define vertex positions float positions[] = { -0.5f, -0.5f, 0.0f, 0.5f, 0.5f, -0.5f } // Prepare position buffer (Modern OpenGL) unsigned int buffer; GLCall(glGenBuffers(1, &buffer)); GLCall(glBindBuffer(GL_ARRAY_BUFFER, buffer)); GLCall(glBufferData(GL_ARRAY_BUFFER, 3 * 2 * sizeof(float), positions, GL_STATIC_DRAW)); // Specify vertex attribute pointer GLCall(glEnableVertexAttribArray(0)); GLCall(glVertexAttribPointer(0, 2, GL_FLOAT, false, sizeof(float) * 2, (const void*)0));
We initialize an array of floats representing x and y coordinates of points in the triangle, and then copy the contents of that array over to a newly generated buffer. The second argument to glBufferData is the size of array data being copied over in memory, which equals the size of 3 vertices * 2 coordinates-per-vertex * the size of a float. The GLCall function is a little error catching function to help if any of those function calls silently fail. Then we use glVertexAttribPointer to specify the layout of this buffer, in this case two floats per vertex position.
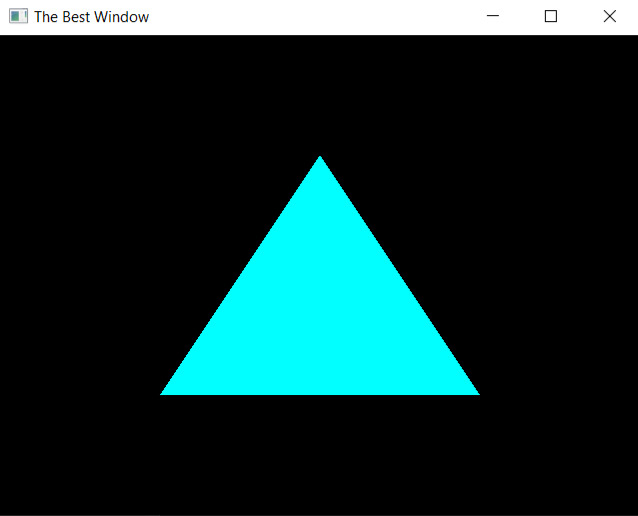
This gets us to the point of having a nice little triangle, which looks basically identical to the previous one but is running in modern OpenGL under the hood. Transitioning from this flat 2D triangle to a 3D cube requires a couple of important changes. First it requires a third coordinate for each vertex position, and consequently the sizes specified in the buffers and vertex attribute pointer must be adjusted accordingly. Other than that initializing vertices for the cube works the same as for a triangle, just with a lot more of them.
Secondly we need some kind of projection and view transformation. I used the OpenGL Mathematics (GLM) header to generate this, as well as a rotation matrix to spin the cube for a better viewing angle.
// Orthographic projection matrix glm::mat4 proj = glm::ortho(-2.0f, 2.0f, -1.5f, 1.5f, -1.0f, 1.0f); // Rotation matrix, 25 degrees around x-axis, 45 degrees around y-axis glm::mat4 rot = glm::mat4(1.0f); rot = glm::rotate(rot, glm::radians(25.f), glm::vec3(1.0, 0.0, 0.0)); rot = glm::rotate(rot, glm::radians(45.f), glm::vec3(0.0, 1.0, 0.0));
These two matrices are sent to the vertex shader as uniform mat4's and multiplied with the position. The code below sends the projection matrix to a uniform attribute called "u_MVP" in the shader. The process is similar for sending other attributes like color and light direction, though the exact format of the call to glUniform varies depending on the type of the data.
GLCall(int location = glGetUniformLocation(shader, "u_MVP")); ASSERT(location != -1); GLCall(glUniformMatrix4fv(location, 1, GL_FALSE, &proj[0][0]));

You can see the silhouette of the cube now, but with just a flat color and no real lighting we're just trusting ourselves that this is really a cube and not a flat hexagon. So the last step is to add some simple shading. For this exercise I just stuck to a very rudimentary white directional light and some ambient light to brighten up the darkest faces.
The direction of the light is sent to the vertex shader as a uniform vector, and the ambient light intensity is a single float. Since we're not doing any smooth shading all the light calculations can happen in the vertex shader and be sent to the fragment shader as an intensity value. This requires the vertex shader to know the normal direction at each vertex though, which is something I hadn't added at this point. So I went back and added a new buffer of normal data in the same way I created the position buffer earlier.
The light intensity is calculated using the dot product of normal and light directions, with ambient intensity added in afterward.
intensity = clamp(dot(normal.xyz, u_lightDirection.xyz) + u_ambient, 0, 1);
This value is then sent to the fragment shader and multiplied with the color value at each fragment (which is still just a constant color), resulting in the basic lit model shown to the right.
Conclusions
This little renderer obviously isn't sufficient for practical use, but as an exercise it's served its purpose of getting me back into OpenGL and clarifying some of the concepts that I didn't retain in school.
I'll plan to do a more in-depth write-up for a renderer in the future, and perhaps even return to this one when I want some more OpenGL practice to add texture support, more sophisticated lighting, and other transformations. But in the meantime it's a simple working display window written in C++ using OpenGL.